
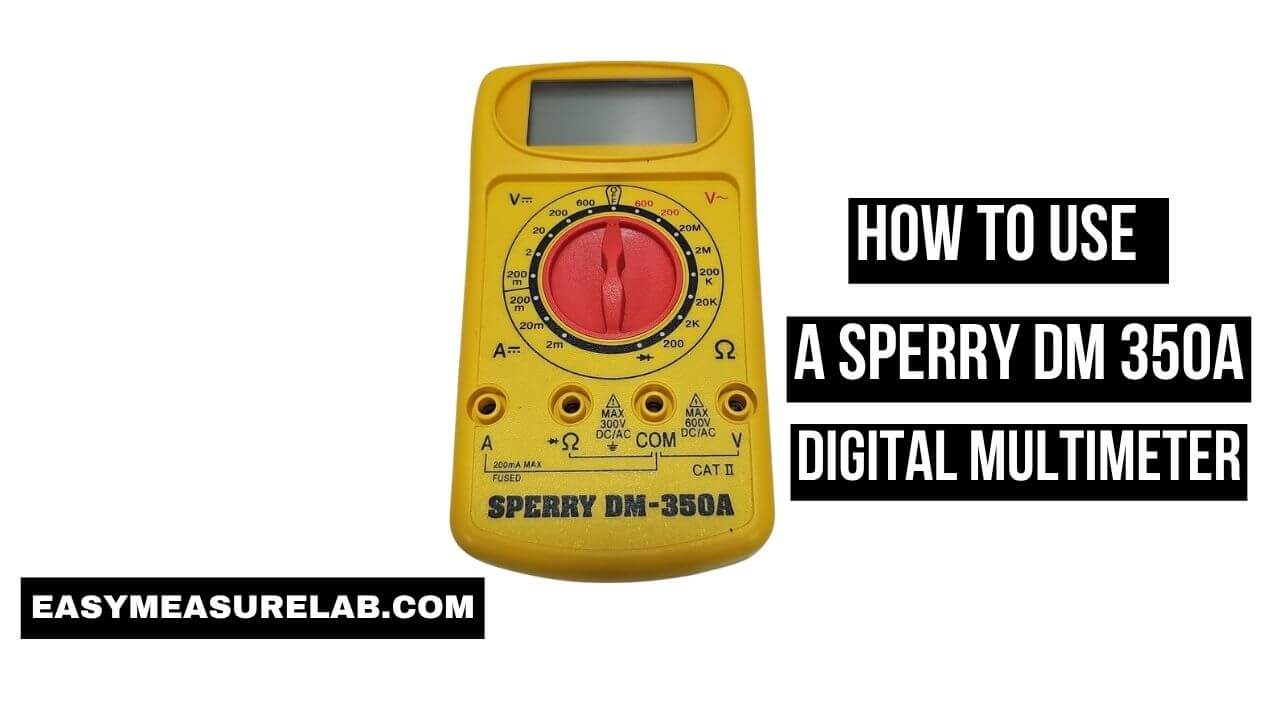
I found my old Sperry meter in a dusty tool box. It looked very hard to use. I just wanted to test a dead car battery. I stared at the dial. I saw too many numbers. I felt totally lost.
Learning how to use a Sperry DM 350A digital multimeter is actually very easy. You do not need to be an expert. I will show you what each dial setting does. You will learn to test batteries, wall plugs, and wires. I will share my best tips. You will fix things with confidence today.
Getting to Know the Sperry DM 350A Parts
The front of this tool has three main sections. You must learn these first to stay safe.
When you look at the meter, you see a screen at the top. You see a big wheel in the middle. You see three small holes at the bottom. The big wheel is the dial. You turn this dial to pick your test. The holes are for your test wires.
| Meter Part | What It Does | Why It Matters |
| Top Screen | Shows your test numbers. | Tells you if a part is good or bad. |
| Middle Dial | Changes the test mode. | Keeps the meter from blowing up. |
| Bottom Holes | Connects the test wires. | Brings the power into the tool safely. |
Where to Plug in the Probes
The tool comes with a red wire and a black wire. We call these wires probes.
You must put the probes in the right holes. Look at the bottom of the meter. You will see a hole marked “COM”. This means common. Push the black probe into the COM hole. It always stays there.
Now look for the hole marked “VΩmA”. Push the red probe into this hole. You will use this setup for almost all tests. There is a third hole for high amps. You will rarely use it. I have never used it for home repairs.
Understanding the Manual Dial
This tool is a manual-ranging meter. It does not guess the numbers for you.
Many new meters do the math for you automatically. The Sperry DM 350A is older. It requires you to pick the number range. If you want to test a 9-volt battery, you must pick a number on the dial higher than 9. This confused me at first. I will show you exactly which numbers to pick.
How to Use a Sperry DM 350A Digital Multimeter for DC Voltage
DC voltage is the power inside batteries. Cars, toys, and phones all use DC power.
If your car will not start, test the battery. If a toy will not turn on, test the small batteries. We use the DC setting for this. On the Sperry dial, look for the “DCV” section. It might also look like a “V” with straight lines next to it.
Setting the Dial for a Car Battery
A car battery holds 12 volts of power. You must pick a number higher than 12 on the dial.
Turn the dial to the “20” mark in the DCV section. The meter is now ready to read up to 20 volts. Touch the red metal tip to the positive battery post. Touch the black metal tip to the negative battery post. Look at the screen. A good car battery shows about 12.6 volts.
| Battery Type | Power Level | Dial Setting to Pick |
| Standard Car Battery | 12.6 Volts | 20 DCV |
| Small AA Battery | 1.5 Volts | 20 DCV (or 2000m) |
| Smoke Alarm Battery | 9.0 Volts | 20 DCV |
Testing Small Household Batteries
You can test AA or AAA batteries too. This saves you from throwing away good batteries.
Keep the dial on the 20 DCV setting. Touch the red tip to the top bump of the battery. Touch the black tip to the flat bottom. A fresh AA battery reads 1.5 volts or higher. If it reads 1.0 volts, the battery is dead. Throw it in the trash. You can learn more about battery voltage charts online to see exact numbers.
Testing AC Voltage in Home Outlets Safely
AC power lives in your house walls. This power can hurt you badly if you are careless.
AC power stands for alternating current. It powers your lamps, TV, and fridge. When an outlet stops working, I test it with the meter. I do this before I call an expensive pro. Look at the dial. Find the “ACV” section. It has a “V” with a squiggly line next to it.
Setting the Dial for Wall Plugs
House outlets in the USA push out 120 volts of power. You need a high setting.
Turn the dial to the “200” mark in the ACV section. You must pick a number higher than 120. Do not touch the metal tips of the probes. Hold the plastic handles only.
Pushing the Probes into the Wall
You must be very steady here. Make sure your hands are dry.
Push the black probe into the wide slot on the wall plug. Push the red probe into the narrow slot. Look at the screen. It should read around 118 to 122 volts. If it says zero, the plug has no power. A hidden house breaker might be tripped.
| Wall Plug Slot | Probe Color to Use | What It Means |
| Narrow Slot | Red Probe | Hot wire with live power. |
| Wide Slot | Black Probe | Neutral return path. |
| Round Bottom Hole | Either Probe | Safety ground wire. |
Checking Broken Wires with the Ohms Setting
This tests if a wire is broken inside. We call this a resistance test.
I use this setting the most. I fixed a broken guitar cord using this exact trick. The setting is marked with an Omega symbol (Ω). It looks like a little horseshoe. This mode sends a tiny drop of power through the part.
How to Test a Glass Fuse
Fuses blow out to save your gear. You can test them to see if they melted inside.
First, take the fuse out of the car or radio. Never test resistance with the power turned on. Turn the dial to the lowest Ohms setting. This is usually “200”. Touch one probe to each metal end of the fuse.
| Screen Number | What It Means | What to Do Next |
| Close to 0.0 (like 0.2) | Path is clear. | Keep it. The fuse is good. |
| Jumping numbers | Bad connection. | Wipe the metal tips clean. |
| Shows 1 or OL | Path is fully blocked. | Buy a new fuse. It blew. |
Reading the “1” on the Screen
This trips up many beginners. It confused me for days.
If you test a wire and the screen stays on “1” on the far left side, the path is broken. The meter says the resistance is too high to count. The wire is snapped in half. You need to fix the wire.
Common Mistakes When You Learn How to Use a Sperry DM 350A Digital Multimeter
I made silly errors when I first got my meter. My numbers were wild. I felt dumb.
I want to share my failures. You will not repeat them. Avoiding these traps makes your work much faster. I broke my first tool because I rushed. Basic multimeter safety rules matter a lot.
Leaving Power on During Ohm Tests
This is the fastest way to ruin your tool. I did this on a toy car.
I left the toy turned on. I tried to test a wire for resistance (Ohms). The toy power fought the meter battery. It popped a tiny fuse inside my tool. I had to take the whole meter apart. Always unplug the power before testing Ohms.
| Mistake I Made | Why It Failed | My Better Approach |
| Testing live boards | Wall power burned the meter. | Unplug from the wall first. |
| Touching metal tips | My skin added false resistance. | Hold the plastic grips only. |
| Using dirty probes | Rust blocked the true reading. | Wipe tips with rubbing alcohol. |
Guessing the Wrong Dial Range
The DM 350A forces you to pick the range. I used to guess low.
If you try to read a 12-volt car battery, but you set the dial to “2000m” (which means 2 volts), the meter gets confused. The screen will just show “1”. It means the power is out of bounds. Always guess high. If you do not know the power level, start at the very highest number on the dial. Then turn it down slowly.
Changing the Battery and Internal Fuse
Your meter will die eventually. The screen will go blank. Or it will act crazy.
The Sperry DM 350A runs on a simple 9-volt battery. It is hidden inside the plastic case. It also has a small glass fuse inside. This fuse protects the tool if you make a mistake.
How to Open the Back Case
You need a small cross-head screwdriver. Do not pry the plastic with a knife.
Look at the back of the tool. You will see two small screws. Take them out. Lift the back plastic shell off. You will see a green board. You will also see the square 9-volt battery. Pull it out gently. Snap a fresh one in.
| Tool Problem | Likely Cause | Easy Solution |
| Screen stays blank | Internal 9V battery is dead. | Open back and replace it. |
| Faded screen numbers | Battery is getting very weak. | Put a fresh battery in today. |
| Ohms test reads zero always | Internal glass fuse popped. | Replace the tiny 200mA fuse. |
Why the Internal Fuse Matters
I blew my fuse early on. I was very mad. But the fuse saved my life.
If you test a wall outlet, but you leave the dial set on Ohms, the tool gets hit with huge power. The tiny glass fuse inside pops instantly. This stops the tool from catching fire in your hand. You can buy a new glass fuse at any hardware store for one dollar. Just clip it into the silver holders on the green board.
Learning to Test Continuity
Some tools have a beeping sound. The DM 350A has a basic test for this.
Continuity just means a solid path. If a wire is solid from end to end, it has continuity. This helps you find bad lamp cords.
Testing a Lamp Cord
My favorite lamp stopped working. I unplugged it from the wall.
I set the dial to the lowest Ohms setting. I put the red probe on the wall plug prong. I put the black probe on the wire inside the lamp base. The screen read “1”. The wire was broken inside the rubber tube. I replaced the cord. The lamp worked perfectly. You can learn more about simple electrical circuits online to understand how paths work.
Final Thoughts
Learning how to use a Sperry DM 350A digital multimeter is a great skill to have. It feels strange at first. The dial looks scary. But you will get used to it very fast. I use mine all the time now.
Practice on parts you know are safe. Test a new AA battery. Test a brand new fuse. Watch how the screen acts. Never forget the main rule: kill the power before testing Ohms. Take your time. You can stop guessing. You can start fixing things for real.
Frequently Asked Questions (FAQs)
What does the “1” mean on the far left side of the Sperry screen?
The “1” means the meter is out of range. If you are testing Ohms, it means the wire is broken. The resistance is too high to count. If you are testing voltage, it means you need to turn the dial to a higher number.
Can I test house wall outlets with the Sperry DM 350A?
Yes. You can test house outlets safely. Turn the dial to the 200 ACV setting first. Hold the probes by the plastic handles. Push the tips into the wall slots. Do not touch the bare metal.
Why are my test numbers jumping around wildly?
Jumping numbers mean you have a bad connection. The metal tips of your probes might be slipping. The part you are testing might have dirt or rust on it. Press the tips firmly into the metal.
Does it matter which color probe goes where?
For testing Ohms (resistance), color does not matter at all. You can swap them. For testing DC voltage (like a car battery), it matters. If you swap them on a battery, the screen will just show a negative sign. It will not hurt the tool.
How do I know if the internal fuse is blown?
If the screen turns on, but the meter reads absolute zero on every single test you try, the fuse is likely blown. You must open the back case. Look at the tiny glass tube. If the wire inside the glass is broken or black, you need a new fuse.